Tuesday, April 24, 2012

ASBMF- Day 4- April Showers

So, I've been writing papers and finishing projects non-stop for the last 2 days while going to work a few times too. My brain is mush and I'm still not done! I told myself I needed a break and doing my nails is definitely a great one! Hooray for working the creative part of the brain!

Next on my ASBMF Challenge is April Showers. I wasn't sure how I wanted to approach this design, so I put it off for a bit. Good thing I did! The last 2 days have been nothing but rain  in April and provided me with the inspiration I needed.

I knew I wanted to start with a gray base since rainy days are usually dreary. I looked through my stash I found the perfect gray polish- Barielle U-Concrete-Me. It was the perfect watery gray I needed for a rainy day! I applied 2 coats of it.

Looking outside, I spotted the Rhododendron bush that has been in full bloom for a few days now. Perfect addition to my gray background, says me! So, with the dotting tool, I took my bright pink- Essence Ultimate Pink- and made informal flower designs. Then, I took my green striper brush and added a few leaves. The black striper brush was used to add the center dots/stamens to the flowers. Next on my list was to add some rain for the April showers. I figured I'd keep with the really informal look of this manicure and simply took the blue striper brush and made a few quick swishes down the nail. Here's what it looked like:


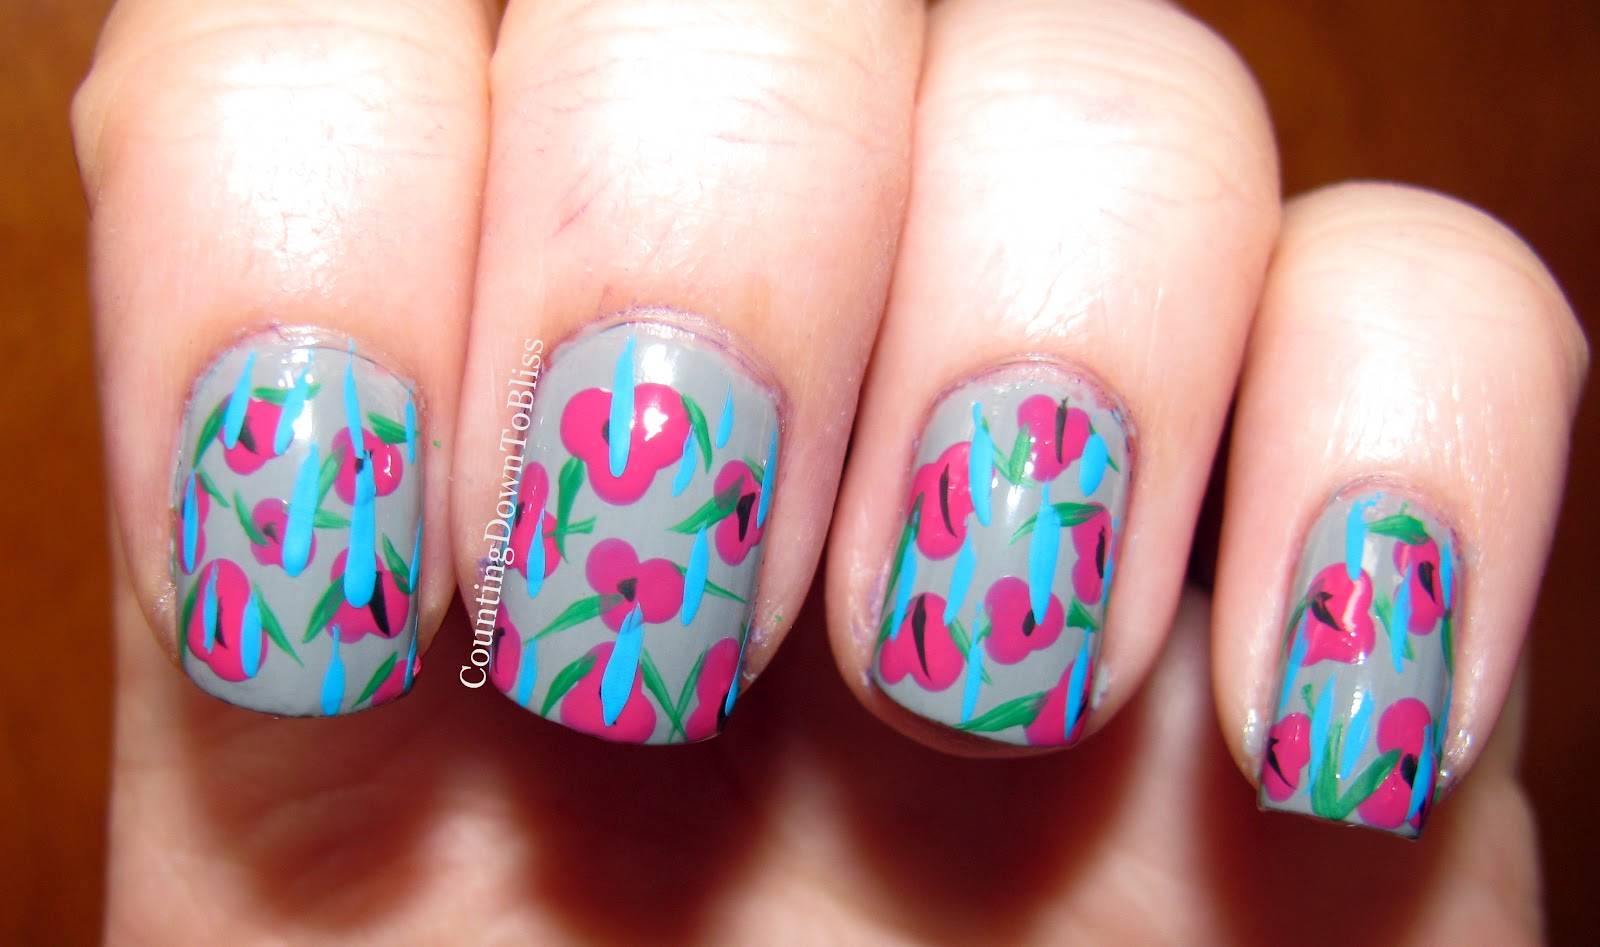
Not horrible. I actually quite liked it. Yet, I felt as though something was missing. So I looked through my polishes again and pulled out Jesse's Girl Fire Fly. It's a clear based polish with color shifting micro glitter. It reminded me of the shimmer of dew so I snatched it up and applied it to my thumb nail for a test.


Gah! I didn't know if I liked it....it showed up more gold on my nail than in this picture...and gold just doesn't make me think of dew. But I continued to examine my thumb nail...and thought a bit. I rocked my finger back and forth, watching as the colors shifted in different light. I didn't hate it. It started to grow on me. I kept it! I applied to the rest of my nails!


I'm really glad I kept it. It added that extra oooomph! I think it actually resembles the decreased viability that goes along with a particularly heavy spring rain. It really does invoke a rainy day feeling. I know it's suppose to be "showers" but here, in Northeastern Pennsylvania....April is unpredictable and more often than not, we end up having spring downpours!

Colors I used in this manicure.


I hope you all enjoyed!

Thanks for reading!
-Amanda

Sunday, April 22, 2012

Proud Peacock

Hey all! I've been so busy with this semester winding down and taking on a few extra days at work, that nail designs and challenges have gone out the window! I wore this polish about a week and a half ago and thought this would be a lovely filler until I'm able to get back to the ASBMF Challenge.

This polish is an indie brand off of Etsy. It's called Proud Peacock and it's made by KBShimmer. Not only does this shop sell nail polish, but they sell hand made lip balms, soaps, bath bombs, and more! When I received my order with Proud Peacock in it, I was excited to find a sample of the lavender soap. It smells lovely and it's beautiful too!


Pictured is 2 coats of Proud Peacock with Seche Vite to finish it off.
Alright, I know I've said this before, but this polish is packed to the brim with amazing glittery yummy times! I have never seen so much glitter apply to the nail with such ease! And then, add the great pigmentation to it, you've got a winner right here! Proud Peacock has a teal/seafoam colored base. Then there's oodles of different glitter pieces in there. There's hex glitter in about 3 different colors (blue, black, and a holographic looking color) and then there's holographic bar glitter, and then micro glitter in magenta (LOVE!) and blue and probably a bajillion other colors! So fun! I certainly recommend finishing it off with a thick topcoat like Seche, otherwise you'll be stuck with an uneven glitter surface.


Bottle shot!

So, if you would like to check out KBShimmer's store, click right here. It does appear the nail polish is out of stock for a bit, and that the best way to stay up to date on restocking is to follow on Facebook. Also, there is a contest in the works. For full details, check out the blog here.

I hope you enjoyed!
Thanks for reading,
-Amanda

Monday, April 16, 2012

ASBMF- Day 3- Glitter Sammy

So, interesting discovery of the day? I only have ONE jelly finish nail polish! I was appalled...but told myself it's okay and that I only need one to complete this challenge. I've never once done a glitter sammy (which I think is obvious since I only have one jelly polish) and I was excited to try something new!
For those of you who may not know what a glitter sandwich manicure is, I'll explain quickly. It's when you take a jelly finish nail polish (a polish that is less opaque than a normal polish and has a very distinct squishy appearance to it). On top of your jelly polish, you apply a glitter polish (preferably one that is suspended in a clear base) and then complete with one more coat of the jelly polish. The resulting look is suppose to be as if you can look into your nail forever, observing layers and layers of gorgeous glitter that rests, suspended in your jelly polish. 

For mine, I began with 2 coats of NYX Girls Ink Heart. This is a stunning inky, glowing jelly blue polish. I adore this polish. I decided to layer lots of glitters, so on top of Ink Heart, I put a coat of Nubar 2010- mostly because I wanted an excuse to use a flakie. On top of that, I put a coat of China Glaze Fairy Dust- a lovely holographic glitter. My last glitter addition was Wet n Wild's Party of Five Glitter. I finished the whole thing with one coat of Ink Heart and a coat of Seche Vite to seal it.

I'm going to say I prefer the manicure without the last coat of Ink Heart- yes, I know that "unsandwiches" the manicure, but it was really better. Take a look:


I just want to say sorry about my camera. It's dying I think. It decides to only focus in on the pinky and ring finger in most pictures today. But, you can really see the holographic goodness in the middle and pointer fingers
Here's a close up on my thumb, pre-sandwiching. I'm saddened that Nubar 2010 sort of died in the layering, but before I applied Party of Five Glitter, it looked amazing with Fairy Dust. I should have taken a picture of that!

Alright, let's finish up with a bunch of sammy eye candy!


I hope you enjoyed!

Thanks for reading!

-Amanda

Friday, April 13, 2012

Zoya 'Share the Love'

So, one of my favorite nail polish companies, Zoya, is having a new promotion of sorts. If you  don't have a Zoya account, click the link https://www.artofbeauty.com/rd/01047957, and sign up! You'll get a coupon for a free bottle of polish (at least until the end of April. After that, it'll go back to being a $5 coupon- still amazing though)! I'll get 100 points toward a free bottle for myself, but you'll get a free one!

Here, this is exactly how Zoya explains it:
When someone clicks on your personal link and sets up an online account, a $5 coupon a coupon for a FREE Bottle of Zoya Nail Polish will automatically be placed in their account and can be used immediately on their current order. TIP: If you use this coupon and add 2 more polishes to your order, you get free shipping too! The coupon will appear in the "My Coupons/ Promos" section of their "My Account" Page.


(taken from Zoya)


You won't regret it. Zoya is an amazing company that constantly does promotions and giveaways for their polishes- which happen to be gorgeous!!
Check it out!

ASBMF Challenge 2- Ladybugs

Finally on to challenge #2! This one, for whatever reason, I was having a hard time beginning. I went to look and see which red polishes I had, and guess what? I only have ONE! I was slightly surprised, but then not really as I'm more apt to wear brighter, less traditional colors most of the time. I had bought Zoya Isla this last December when they were having their amazing flash promotions. Speaking of which, I will be posting some amazing information about Zoya immediately after this post.

Alright, here's my ladybugs!


I used 2 coats of Zoya Isla for the base. Then my black Stripe Rite nail art brush, Sinful Colors Black on Black, and NYC White.

Here are some other ladies that completed challenge #2 as well:
Hannah from Polished Prisms
Amanda from Mandy's Polish
Heidi from DIY Polish & More!
Charlotte from Charlotte's Nails
Ashley from One Nail to Another
Sue from Creative Nail Design by Sue
Karine from Karinea0a
Victoria from Manicurator
Dani from Rustic Comfort
Kayono from Neus Vom Kellerkind
Tess from Football and Fingernails
Katee from A Girl and Her Polish
Sarah from All This Polish
Jess from Nearly Natural Nails


Hope you enjoy!

-Amanda

Tuesday, April 10, 2012

Candeo Colors 'Sprouse'

This is one of the first Etsy indie brand polishes I was able to buy. I just think it's the best thing ever that there are people out there mixing up one of a kind glitter and pigment concoctions and starting their own businesses! I feel like it would be a dream job for me! Maybe some day in the future I'll finally perfect my haphazard hobbies like making jewelry and mosaics and make some money with them. Oh, and throw in learning how to make nail polish! ...no big deal, right? HAH!

Sooo...nail polish time! I present to you Candeo Colors Sprouse. This is a clear base polish with some amazing glitter in it! Let's start with a bottle shot!


Is that not amazing, or what? You've got holographic micro glitter that blankets the whole thing! And then there are varying sized hex glitters in a royal blue, white, and black. Lovely!

As this is a clear based polish, I needed to decide on a base color. I had just bought some new Essence colors and they were staring at me and screaming pick me! pick me! I ultimately decided on Essence You Belong to Me- a lovely muted sea green color. 

Pictured above are two coats of You Belong to Me and 2 coats of Sprouse. Sprouse went on the nail beautifully! The glitter for the most part was easy to get out of the bottle and on to the nail. I did keep the bottle upside down before using, so that could have been influential to the glitter application. 


SO MUCH GORGEOUS GLITTER!

I seriously am liking this polish. It can truly be layered over any colored base- it's so versatile! If you'd like to purchase your own, you can find the Etsy shop here. They are currently closed, but should hopefully be open again soon. In the meantime, you can check out their Facebook page here. I can't wait to purchase a few more of these gorgeous glitters!

Thanks for reading!
-Amanda

Sunday, April 8, 2012

Happy Easter!

I hope you all have a wonderful holiday with your families! I just wanted to quickly share my Easter nails with you. These are not only my holiday nails, but are also the first result of a nail challenge! I've never done one before and have truly wanted to. For those of you who may not know what a nail challenge is, let me do my best to explain. Someone comes up with an overall topic for nail art and then breaks it down into a specific challenge for each day/week/month. Bloggers and non-bloggers alike are more than welcome to participate and it's just amazing to see the different works of art that each individual makes for that day's/week's/month's topic! The one I'm participating in was created by Hannah over at Polished Prisms. It's a spring themed challenge and it's AMAZING! She shared it in a group we're in on Facebook and the response to participate was a resounding YES!

Here is what her challenge consists of:

(Image taken from Polished Prisms)

As you can see, it's a fun challenge, and extremely laid back! No need to do a new design every day if that's not what you want to do! If you would like to participate, be sure to head on over to the Facebook page here, and request to join. You can see what everyone else is up to and share what you've created!

Alright, enough jabber, let's get to the nails!
As you can see, challenge #1 is Spring Pastels. I thought I had more pastels, but in the end, I had enough to get the job done!


I knew I wanted to do something girly and fun for Easter and pastels seemed like a great way to go, so I was able to knock out challenge #1 and an Easter manicure at the same time! I chose to do a skittle manicure (every nail a different color, but still in the same tone/color family) and I'm in love with my dotting tools so that had to happen. 


I used the same colors throughout. The base colors on my nails are as follows:
Thumb- Essence You Belong to Me
Index- Zoya Sweet
Middle- Essence A Lovely Secret (I just need to say how much of a SURPRISE this polish was! Never would have guessed this sparkly deep gorgeousness would come out of this tiny bottle!)
Ring- Essence Mellow Yellow
Pinky- Nubar Blue Hydrangea


Then with my dotting tool, I just layered the colors. I have to say I'm pretty happy with my Easter/April Showers Bring May Flowers Challenge #1 designs!


I hope you all have a wonderful day, and thanks for reading!
-Amanda

Monday, April 2, 2012

All That Glitters Giveaway Prizes Part 1

I'm ashamed it took me this long to get even two polishes swatched and photographed. Grad school wasn't cooperating, and neither was the sun (for the pictures). Anyway, I have 2 of the Bowie Collection polishes from All That Glitters. These are all hand mixed polishes made by the wonderful Kirsten.You can check out her Etsy store here and you can check out her Facebook page here.

So, on to the polish then?

I think so.

First up is Rebel Rebel.


As you can see, Rebel Rebel is a lovely purple and glitter polish. I decided to layer it over Rimmel Climax to preserve it. In all of the pictures, I have one coat Rimmel Climax and one coat Rebel Rebel. Such a gorgeous polish.


Second up is Space Oddity. Before we get to the polish, I just want to apologize for the messy cuticles and photos that are lacking quality. The sun didn't feel like coming out to play and then briefly it did so I hurried and in the chaos, left messy finger. Oh well. Space Oddity is a smoky charcoal base with all sorts of glittery goodness in it! Take a look!

I layered the polish over Sinful Colors Black on Black to make it more vibrant. Such a gorgeous polish. It looks like the night sky on my nails!


I just want to say thank you again to Kirsten for these amazing prizes. These polishes are gorgeous and I still have 2 more to show you! Stay tuned!

Thanks for reading,
-Amanda